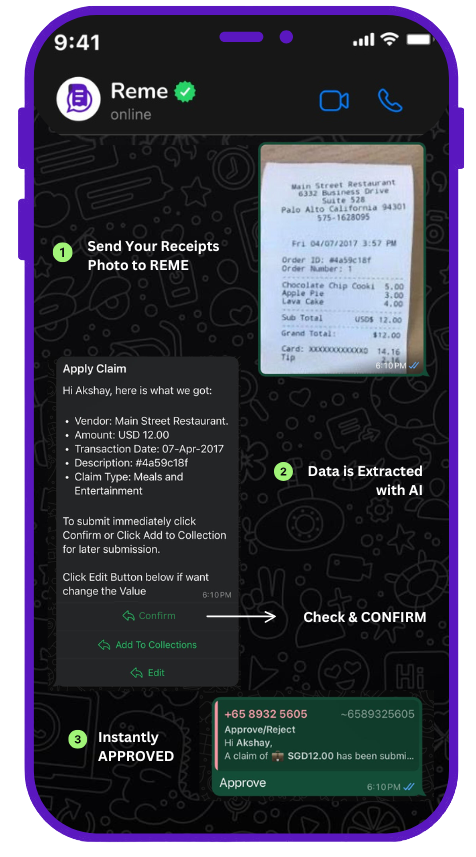
In today’s digital business ecosystem, the power of connected systems cannot be overstated. When your expense management solution communicates seamlessly with your accounting software, you create a financial data ecosystem that reduces errors, saves time, and provides deeper insights. REME’s WhatsApp-based expense management system offers powerful integration capabilities with popular accounting platforms, creating a streamlined expense-to-accounting workflow that transforms financial operations.
Why Integration Matters
Before diving into the specifics of connecting REME with your accounting software, let’s consider why this integration is so valuable:
The Cost of Disconnected Systems
Disconnected expense and accounting systems create numerous inefficiencies:
- Manual Data Transfer: Finance teams spend hours re-entering expense data into accounting systems
- Transcription Errors: Manual entry inevitably leads to mistakes that can cascade through financial reports
- Reconciliation Challenges: Discrepancies between systems require time-consuming investigation
- Delayed Financial Closure: Month-end and quarter-end processes extend as teams struggle to synchronize data
- Limited Data Visibility: Decision-makers lack a unified view of financial information
A mid-sized manufacturing company estimated they were spending over 40 person-hours per month just transferring and reconciling expense data between systems before implementing REME’s integrated solution.
The Integration Advantage
When REME connects directly with your accounting software, these friction points disappear:
- Automated Data Flow: Expense information flows automatically into your accounting system
- Reduced Errors: Elimination of manual entry means fewer mistakes
- Faster Financial Close: Month-end processes accelerate with pre-reconciled data
- Real-Time Financial Visibility: Accounting records reflect expense activity as it happens
- Enhanced Audit Readiness: Complete digital audit trails connect expenses to accounting entries
REME’s Integration Ecosystem
REME has developed comprehensive integration capabilities with major accounting platforms to suit businesses of all sizes:
Small Business Solutions
- QuickBooks Online: Direct API integration with customizable sync schedules
- Xero: Real-time connection with automatic category mapping
- FreshBooks: Seamless expense sync with project coding capabilities
- Wave: Automated expense transfer with tax category assignment
Mid-Market Platforms
- Sage Intacct: Dimensional accounting support with custom field mapping
- NetSuite: Deep integration with subsidiary and department structures
- Microsoft Dynamics 365 Business Central: Comprehensive company code and project integration
- Zoho Books: Automated vendor and category synchronization
Enterprise Solutions
- SAP: Certified integration with cost center and GL account validation
- Oracle ERP Cloud: Enterprise-grade connection with multi-entity support
- Microsoft Dynamics 365 Finance: Complex approval workflow integration
- Workday Financial Management: Sophisticated dimension mapping and validation
Integration Setup: A Step-by-Step Guide
Setting up the integration between REME and your accounting software is straightforward but requires careful planning. Here’s a comprehensive guide to ensure a successful implementation:
1. Pre-Integration Planning
Before initiating the technical connection, preparation is essential:
Map Your Chart of Accounts: Review your chart of accounts and determine how REME expense categories should map to your accounting structure. Consider:
- General ledger accounts for different expense types
- Department or cost center allocations
- Project or client codes for billable expenses
- Tax codes and tax treatment
Define Synchronization Frequency: Determine how often data should flow between systems:
- Real-time synchronization for up-to-the-minute financial data
- Daily synchronization for balanced performance and timeliness
- Weekly synchronization for less time-sensitive operations
Establish Validation Rules: Define what constitutes a valid expense record ready for accounting integration:
- Required fields and documentation
- Approval status requirements
- Amount thresholds for special handling
2. Authentication and Connection
With planning complete, establish the technical connection:
- Navigate to the “Integrations” section in your REME dashboard
- Select your accounting software from the available connectors
- Follow the OAuth authentication process or enter API credentials
- Grant appropriate permissions for data exchange
- Test the connection to verify successful authentication
3. Field Mapping Configuration
Once connected, configure how data fields translate between systems:
Basic Mapping:
- Map expense categories to GL accounts
- Connect employees/users to vendors or employees in accounting
- Align payment methods with corresponding accounts
- Link tax codes between systems
Advanced Mapping:
- Configure multi-dimensional allocations (department, project, location)
- Set up currency conversion rules for international expenses
- Establish custom field mappings for organization-specific needs
- Define handling of split expenses across multiple allocations
4. Validation and Error Handling
Configure how the integration should handle exceptions:
Data Validation Rules:
- Set minimum data requirements for expense transfer
- Establish amount thresholds for additional review
- Configure date range validations for proper accounting periods
Error Handling Protocols:
- Define notification recipients for integration errors
- Configure retry logic for failed synchronizations
- Establish exception queues for manual resolution
- Set up automated alerts for persistent issues
5. Testing the Integration
Before relying on the integration in production, thorough testing is crucial:
- Create test expenses in REME representing various scenarios
- Verify proper synchronization to the accounting system
- Confirm correct account assignment and allocations
- Test edge cases (split expenses, international currencies, etc.)
- Validate error handling by deliberately creating exception scenarios
6. Go-Live and Monitoring
With testing successful, prepare for operational use:
- Schedule the go-live during a suitable accounting period transition
- Communicate changes to finance team and expense submitters
- Establish monitoring procedures for the first synchronization cycles
- Document the integration setup for future reference
- Configure ongoing integration health monitoring
Specialized Integration Scenarios
Beyond basic expense synchronization, REME offers advanced integration capabilities for specialized needs:
Multi-Entity Business Structures
For businesses operating multiple legal entities:
- Configure entity-specific expense policies and approvals
- Maintain separate GL mappings for each entity
- Enable inter-entity expense allocations and transfers
- Generate entity-specific financial reporting
Project-Based Businesses
For professional services or project-centered organizations:
- Integrate project codes between REME and accounting
- Enable project budget tracking and alerts
- Facilitate client billable expense identification
- Support project profitability analysis
International Operations
For global businesses managing multiple currencies:
- Configure currency conversion rules and timing
- Support country-specific tax regulations
- Manage international VAT/GST reclamation
- Handle multi-language expense descriptions
Integration Best Practices
Based on hundreds of successful implementations, we’ve identified key best practices for REME-accounting integration:
Start with Clean Data: Before integration, ensure your chart of accounts and vendor records are accurate and up-to-date.
Phase Your Implementation: Consider a phased approach, starting with basic expense categories before moving to more complex allocations.
Create Clear Documentation: Document your integration choices for future reference and team training.
Establish Reconciliation Processes: Even with automation, periodic reconciliation checks ensure continued accuracy.
Review and Refine: Schedule quarterly reviews of your integration to identify optimization opportunities.
Maximizing ROI on Your Integration
The true value of connecting REME with your accounting software goes beyond basic automation. Consider these strategies to maximize return on your integration investment:
Enhanced Financial Analytics: Use the combined dataset for deeper spending insights across departments and projects.
Accelerated Reimbursement Cycles: Leverage integration to speed up employee reimbursements through automated payment initiation.
Improved Audit Readiness: Maintain comprehensive audit trails connecting expenses to accounting entries.
Real-Time Budget Management: Link departmental budgets to actual expense data for continuous budget monitoring.
Streamlined Tax Compliance: Automatically categorize expenses for tax purposes and simplify tax filing preparation.
The Future of Financial Integration
As REME continues to evolve, our integration capabilities are expanding to include:
- Predictive Analytics: AI-powered expense forecasting based on historical patterns
- Smart Allocations: Automated cost distribution suggestions based on expense characteristics
- Continuous Reconciliation: Real-time expense-to-accounting reconciliation with exception flagging
- Voice-Activated Reporting: Conversational interfaces for cross-system financial inquiries
By connecting REME’s innovative WhatsApp-based expense management with your accounting software, you’re not just streamlining processes—you’re creating a foundation for financial intelligence that drives better business decisions.
Whether you’re a small business looking to save time on bookkeeping or an enterprise seeking sophisticated financial controls, REME’s integration capabilities provide the connectivity, accuracy, and efficiency needed in today’s fast-paced business environment.


